Tuesday, October 30, 2012

Pumpkin Granola


It is still Fall and I am still making everything pumpkin.  Granola is a great snack but can often pack in a surprising number of calories.  This recipe is relatively "skinny."  The canned pumpkin is utilized as the glue for the granola mixture.  The pumpkin puree combined with the traditional pumpkin spices makes this a very flavorful granola.  I have been eating this plain as a snack and with a banana and milk as a quick breakfast.  As with any granola, you should feel free to adjust and improvise the ingredients to make this what you want.

Recipe from Skinny Taste

Ingredients:
  • 1/4 cup uncooked quinoa, rinsed well and pat dry with paper towel
  • 1 1/2 cups rolled oats
  • 1/4 cup ground flaxseeds
  • 1/4 cup pepitas (pumpkin seeds)
  • 1/4 cup chopped pecans, almonds, walnuts, or whatever you like
  • 1/2 cup dried cranberries, apricot or dates
  • 1/4 cup real maple syrup (or honey)
  • 1/4 cup pumpkin puree
  • 1 tsp oil (coconut or canola)
  • 2 tsp pumpkin spice (or more to taste)
  • 1 tsp cinnamon
  • pinch kosher salt
  • 1/2 tsp vanilla extract
Directions:
  • Preheat oven to 325° F.  
  • Spread oats and quinoa out on a parchment lined baking pan. Toast in the oven 10 minutes, stirring once.
  • Remove the oats from the oven, pour the toasted oats into a medium bowl and add the ground flaxseeds, pepitas, pecans and dried fruit. 
  • Reduce oven to 300° F.
  • Add maple syrup, pumpkin puree, oil, pumpkin spice, cinnamon, salt and vanilla.  Stir together with a spatula. 
  • Spread back onto a baking sheet and bake an additional 20 minutes, or until golden.

Tuesday, October 23, 2012

Butternut Squash, Black Bean Burritos

I have a new favorite food and it is roasted butternut squash.  It is the perfect Fall food.  The squash is sweet and meaty and is a great healthy addition to so many recipes.  I made a big helping of this burrito filling on the weekend and we have been eating burritos and burrito bowls for lunch all week long.  The recipe stores extremely well and its a nice hot meal to come home to after a long run outside.

Ingredients:
  • 1 medium butternut squash, peeled, cubed, & roasted
  • 1/2 cup uncooked short grain brown rice (yields: 1.5 cups cooked)
  • 1-2 tsp olive oil
  • 1 cup chopped sweet onion
  • 1 or 2 large tomatoes, diced
  • 2 garlic cloves, minced
  • 2 red pepper, chopped
  • 1 tsp kosher salt, or to taste
  • 2 tsp ground cumin, or to taste
  • 1/4 tsp cayenne pepper, or to taste
  • One 15-oz can black beans (about 1.5-2 cups cooked), drained and rinsed
  • Toppings of choice: (avocado, salsa, spinach/lettuce, cilantro, etc)

Directions:
Preheat oven to 425F and put chopped squash in a large glass dish. Drizzle olive oil on squash and give a shake of salt and pepper. Coat with hands. Roast chopped butternut squash for 45 mins or until tender.

While the squash is roasting, cook your brown rice as directed on the package.

Then, in a large non-stick pan,  over medium-low heat, add oil, onion, and minced garlic. Sautee for about 5 minutes, stirring frequently. Now add in salt and seasonings and stir well.  Then, add chopped red pepper, diced tomatoes, black beans, and cooked rice and sauté for another 10 minutes on low.

When butternut squash is tender remove from oven and cool slightly. Add the cooked butternut squash to the skillet and stir well. You can mash the squash with a fork if some pieces are too large.


When you are ready to eat add filling to a tortilla with your favorite salsa, cheese, etc.  Also, you can throw it in a bowl, topped with lettuce for a lower carb option.  Save the leftovers and enjoy!

Tuesday, October 16, 2012

Pumpkin Pie Smoothie


I sent my mother a text after making this recipe and her reply was, "Hmmm."  So, I imagine that you may be thinking the same thing.  My advice, don't knock it until you try it.  This smoothie is good, healthy, filling and a great way to use up leftover pumpkin puree from your Fall baking.

I pulled the recipe from a great blog which focuses on real (unprocessed) food recipes, Oh She Glows
The original recipe was for 2 servings so below you will see I've halved that for just a single serving. Additionally, I streamlined the spices to use Pumpkin Pie spice.  Finally, I highly recommend that you use a good and REAL maple syrup.

Pumpkin Pie Smoothie

Ingredients:
  • 1 cup unsweetened almond milk (or whatever milk you prefer)
  • 1/4 cup rolled oats
  • 1 tbsp chia seeds or flax seeds
  • 1/2 cup canned pumpkin (NOT pumpkin pie)
  • 1/4 tbsp molasses
  • 1/2 frozen ripe banana
  • 2 tsp cinnamon
  • 1/2 tsp pumpkin pie spice
  • 1 tbsp pure maple syrup
  • ice cubes (optional)
Directions:
  • Combine the milk and rolled oats in a bowl and allow them to soak overnight.
  • Add oat mixture, flax seed, pumpkin, molasses, banana, spices and syrup into the blender and blend until smooth
  • If you like a thicker smoothie, add some ice cubes
  • Pour into a glass, add a straw and enjoy!

Tuesday, October 9, 2012

Gingerbread Bundt Cake and the return of baking


It is Fall!  After a hot, long Summer, I can finally turn on my oven again.  To celebrate this occasion I decided to make a very autumn dessert for a luncheon my mom was throwing.  This gingerbread bundt is my new favorite recipe.  The cake tastes unique and flavorful without being too sweet.  The recipe is very easy and the best part is that gingerbread is best made the day ahead of time.  Therefore, this is the perfect thing to bring to a party. 

There are some interesting ingredients in this cake.  Most notable is the cup of molasses and cup of Guinness that makes the rich, dark syrup for the cake.  Lucky for me, I always keep both ingredients on hand.

I pulled the recipe from one of my favorite food blogs, Smitten Kitchen.  If you are looking for a new blog to follow, I highly recommend it.

Ingredients:
  • 1 cup oatmeal stout or Guinness Stout
  •  1 cup dark molasses (not blackstrap)
  • 1/2 teaspoon baking soda
  • 2 cups all-purpose flour
  • 1 1/2 teaspoons baking powder
  • 2 tablespoons ground ginger
  • 1 teaspoon ground cinnamon
  • 1/4 teaspoon ground cloves
  • 1/4 teaspoon freshly grated nutmeg
  • 3 large eggs
  • 1 cup packed dark brown sugar
  • 1 cup granulated sugar
  • 3/4 cup vegetable oil
  • Confectioners sugar for dusting
Directions:
Preheat oven to 350°F.  HEAVILY grease and flour your bundt pan.  I had a lot of gooey goodness left in my pan after baking even after I thought I over-greased.  Really go for it with this one.
Pour guinness and molasses into a large (yes large) saucepan, bring to a boil and then remove from heat.  (You will have some Guinness leftover.  Do NOT let that go to waste!)

Whisk in baking soda.  There will be a fizzy, foamy reaction that occurs.  Don't panic, just keep stirring until it calms down and let it cool to room temperature.
In the bowl of your stand mixer whisk together eggs, white sugar and brown sugar until well combined.  Then, add in the oil and molasses/guinness mixture. Stir until just combined.  Add in the flour, baking powder and spices and whisk again until just combined.
Pour batter into bundt pan and rap pan sharply on counter to eliminate air bubbles. Bake in middle of oven until a tester comes out with just a few moist crumbs adhering, check at about 46 minutes.
Cool cake in pan on a rack 5 minutes. Turn out onto rack and cool completely.
Serve cake, dusted with confectioners sugar, with whipped cream.


Tuesday, October 2, 2012

Pumpkin Chili


I'm always up for trying a new chili recipe.  My mom has perfected a red chili with beef and a white chili with chicken.  I have also tried a vegan sweet potato chili which was well received by herbivores and carnivores alike.  So, when it turned to Fall in Minneapolis and I was looking for some quick weekday meals I decided to give this pumpkin chili a try.

I originally pulled the recipe from Whole Foods but made some of my own modifications.  Their recipe was pretty bland.  So, below you will see my recipe for a chili that I believe has more depth and flavor.  However, as with all chilis, you need to taste and revise as you go.  This makes a good size pot and will freeze well if you want to keep half and freeze half for later in the season.

Ingredients:  Adapted from Whole Foods
  • 2 tablespoons extra-virgin olive oil
  • 1 small yellow onion, chopped
  • 1 green bell pepper, cored, seeded and chopped
  • 1 jalapeño, seeded and finely chopped  (add a 2nd if you want this really spicy)
  • 2 cloves garlic, finely chopped
  • 1 pound ground turkey  (I used 93/7 lean meat but use whatever you like)
  • 1 can diced tomatoes, with their liquid  OR about 2 cups of fresh tomatoes, chopped
  • 1 can pumpkin purée (make sure this is PUREE and not pumpkin pie filling)
  • 1 1/2 tablespoons chili powder
  • 1 teaspoon ground cumin
  • 1 teaspoon cocoa powder
  • 1/2 teaspoon ground cinnamon 
  • 1/2 teaspoon ground ginger
  • 1/2 teaspoon cayenne pepper
  • 1/2 teaspoon salt
  • Ground black pepper, to taste (about 1/2 teaspoon)
  • 1 can kidney beans, rinsed and drained ( You can also try black beans)
Method: 
Heat oil in a large pot over medium high heat. Add onion, bell pepper, jalapeños and garlic and cook, stirring frequently, until tender, about 5 minutes. 

Add turkey and cook until browned. Add tomatoes, pumpkin, all the spices and bring to a boil. Reduce heat to medium low and add beans. Cover and simmer, stirring occasionally, for 30 minutes more or until you reach your desired thickness.   

Note: this would work in a slow cooker as well.  Just brown the turkey, add all the ingredients and let it cook on low all day long.


Thursday, September 27, 2012

An unintended sabbatical

Hi.

Apologies for letting this blog get a little stale.  The last 30 days have been full of travel, weddings,  the ending of Summer, the beginning of Fall, reuniting with loved ones, training for a 10 mile run, reliving the glory days on a beach and exploring America.  After a whirlwind few weeks, I am back home in my beloved city of Minneapolis feeling grateful for my many blessings and drowning in a pile of recipes waiting to be tested.

I have plans to tackle a few Fall recipes this weekend.  So, please check back next week.  I promise there will be something good.

In the mean time, here are a few of my favorite photos from the last 30 days.  Lots of smiling from me.


Thursday, August 23, 2012

The Simplest Summer Dessert

Grilled stone fruit is an incredibly simple, insanely easy and absurdly delicious dessert.  I've made this many, many times and it is always a crowd pleaser.

Here's what you do:
- Get your hands on some *ripe* peaches or nectarines
- Cut in half and remove the pit
- Sprinkle with sugar (regular or brown)
- Heat up the grill to very hot
- Place fruit flesh side down and leave it there until you get some nice grill marks (about 3 minutes)
- Flip to the other side to finish (about 2 minutes)

Once the fruit is grilled my favorite way to serve it is with a scoop of really good vanilla ice cream in the middle.  You can also eat it plain, with some whipped cream or with a scoop of greek yogurt.

Enjoy!

Wednesday, August 15, 2012

Happy Birthday 100th Julia Child!

I adore Julia Child.  Today would have been her 100th birthday.  So, celebrate by eating something delicious or even better COOKING something delicious.


Thursday, August 9, 2012

Grilled Nectarine and Tomatillo Salsa


Last week's CSA box was FULL of tomatoes!  This meant that it was time to make some salsa.  Sunday night, I brought my CSA goods over to my parents house and we made the following salsa to go with our fish tacos.  The salsa was fruity, spicy and delicious with tortilla chips and on top of the fish.

Ingredients:
1 Nectarine
2 Tomatillos
2-4 tomatoes (depending on size)
2 cloves of garlic
1/2 onion or more to taste
1 jalapeño (remove seeds and be careful not to touch them!)
1 green pepper
1 lime
a bunch of cilantro
Salt/pepper
Chili powder
Cumin


Directions:
Fire up the grill, cut nectarine in half and grill until soft and charred.  (About 5-8 minutes)  
Place the tomatillo on the grill, whole for about 8 minutes
Once grilled, let cool and chop.
While that is on the grill, chop up everything else into salsa size pieces.
Place everything in a bowl.
Cut lime in half and squeeze the juice over the ingredients.
Add spices to taste

Salsa is delicious served with tortilla chips, on fish tacos, or over grilled chicken breast.  If you have any leftover it should keep for about a week in the fridge.

Enjoy!

Monday, August 6, 2012

MN Food Truck FAIL

As I mentioned last week, I was really excited for this new event called the MN Food Truck Fair.  It was promoted as a festival of all the food trucks in the metro and a sampling of over 25 different craft breweries.  My friends Joe and Jackie and I had purchased a groupon for $25 which was get us into the event, unlimited craft brew samples and a juicy lucy from the Blue Door Pub.  So, it was in great anticipation that we headed downtown on a beautiful August afternoon.  Little did we know we were heading into a maze of chaos, disappointment and hunger.

We approached the event site and were immediately met with a huge, winding, dense line of people.   This caused a little confusion because it was 12:45 and the fair was to open at 12:30.  Turns out, the organizers were not prepared to open on top so wait we did- for about 30 minutes.  Hungry and thirsty and already frustrated.

Just part of the massive line..

Once we got into the fair we were met with about 12 different truck choices.  Not much of a festival in my opinion.  Also, every truck had about a 20 to 30 minute wait to get any kind of food.  Therefore, we made the quick decision to head for the beer tent first to start sampling.  We were met with another long line.  Once we got up to the front the choices were actually really good (they even had an Octoberfest!) but everyone was only allowed a dixie cup sized portion and only one at a time.  After a 20 minute wait, getting a dixie cup of beer was like a slap in the face.  The entire time we were there we only got 2 cups of beer.

Jackie, Joe and our serving of beer :(
After our stop at the beer tent we went to claim our Juicy Lucy from the Blue Door Pub tent.  The Blue Door was really the one bright spot of the entire fair.  They were turning out sliders really quickly and making sure everyone was taken care of at their tent.  The Blucy (blue cheese and garlic stuffed inside a burger) was phenomenal!
Blue Door Pub- workin' it!
After our sliders we were still hungry so we all split up and jumped into different lines with the plan of meeting back up and sharing what we had.  I went to Chef Shack, Joe went to Twisted Sister and Jackie went to Stanley's.  Joe came back with some decent pulled pork carnitas.  After realizing that Chef Shack only had three options left (many trucks ran out of food 2 hours into the event) I came back with some good pulled pork Nachos.  And Jackie, well, Jackie never made it to the truck at Stanley's.  After waiting in line for over 25 minutes we decided to leave.

The fair was a total bust.  We will never go back. Ever.  The organizer was poorly organized, unprepared for the crowd and did not appear to communicate the number of attendees to any of the vendors.  The day was just a total and complete mess and we definitely did not get our money's worth.

We ended the day drinking away our sorrows at the Monte Carlo. The bartender said they had been overwhelmed by the number of disgruntled fair goers who waltzed in to finally get some food and drinks.


Thursday, August 2, 2012

MN Food Truck Fair


I am pretty excited about this weekend.  Sunday is the MN Food Truck Fair in downtown Minneapolis.     The food truck scene in the Twin Cities is big and continues to grow.  However, unless you work downtown it can be difficult to catch up to one of these trucks.  Most trucks will set up shop downtown for the lunch rush and maybe hit a farmer's market on the weekend.

For the fair, we purchased VIP passes (thank you groupon) which will give us access to unlimited craft beer samplings (and there are a LOT of vendors: Breweries), live jazz music and a juicy lucy.  In addition to that I am looking forward to trying food from:

I'm headed down there on Sunday with my friends Jackie and Joe.  Both have promised to wear their fat girl pants and share.  Check back next week for all the details.

Tuesday, July 31, 2012

Midwestern Nicoise Salad


Every Tuesday I get a little anxious as the anticipation of trying to eat up another box of vegetables from our CSA rolls around.  I have been getting more and more creative and feel less overwhelmed now but it is still quite an effort.  This Midwestern Nicoise salad is a collaboration between me and my mom.  We put it together after I brought over a bag of veggies for our weekly Sunday night dinner.  This is a pretty vague recipe because well, it is a salad so feel free to improvise.

  • Ingredients for vinaigrette:
  • 2 garlic cloves, minced
  • 3 teaspoon Dijon mustard
  • 3 tablespoons red wine vinegar
  • 1/2 lemon, juiced
  • 2 tablespoons chopped fresh flat-leaf parsley
  • 2 tablespoons minced fresh tarragon
  • Sea salt and freshly ground black pepper
  • 1/2 cup extra-virgin olive oil
Directions for vinaigrette:
  • To make the vinaigrette: combine all ingredients in a bowl.  Whisk vigorously to emulsify. Set the dressing aside while preparing the salad so the flavors can marry.
Ingredients for the salad:
2 Grilled chicken breast
1/2 of an avocado
A bunch of green beans
A bunch of snap peas (we left them in the pea pods)
2 large tomatoes
3-5 baby new potatoes
Salad greens
Parsley
Chives
Maybe some mint


Directions for Salad:
  • Grill chicken breast.  You may add BBQ sauce if you wish. Cut into bite size pieces
  • Slice avocado
  • Boil green beans and snap peas for about 4 minutes and then immediately run under cold water to stop the cooking process.  
  • Boil potatoes until soft and slice into discs
  • Slice tomatoes
  • Chop parsley, chives and mint and use as a garnish over the salad
  • Combine all ingredients and dress with the vinaigrette.  Sprinkle with a little pepper and enjoy!


Monday, July 23, 2012

Caramelized Onions

Image: Simply Recipes
Caramelized onions are my new favorite thing to have on hand.  They are incredibly easy to make, keep fairly well in the fridge and are a delicious topping for so many things.  This week our CSA basket delivered 2 large onions so I caramelized a big batch and plan on eating them through out the week on:
- sandwiches
- salads
- in skillets with potatoes, eggs, and tomatoes
- on top of flatbread
- in bruschetta
- warmed over brie cheese as an appetizer with some good crackers


Ingredients:
- onion
- olive oil

Directions:
- slice an onion into discs and use your fingers to separate them out into individual pieces
- heat a non-stick pan on high for about 1 minute
- add a couple teaspoons of olive oil and turn the heat down to low
- cook the onions on low until they turn a light brown color.  By this time they will have reduced down in size and their flavor will condensed to be sweet and mild.
- eat warm from the pan or store in the fridge to be reheated throughout the week

Enjoy!

Friday, July 20, 2012

Cookie Dough


Next Saturday July 28, 2012 is a very big day.   Two of my very best friends will get married to each other.  I have been counting down the days to this wedding for what feels like years!  There are a lot of great things happening at this wedding: a bowling party, live band, really thoughtful decor and the best part a soft serve ice cream machine for dessert.  In an effort to be just a little bit helpful, I offered to make/bake whatever was needed for this eventful weekend.  My friend requested cookie dough to go with the soft serve ice cream sundae bar.


So, I went online and searched for a good tasting, eggless, safe to eat raw cookie dough recipe.  I found one that is meant for cookie dough truffles and modified it slightly for my use.  Pulling this dough together was a little too easy.  I need to be careful that I don't turn cookie dough making into a habit...


Here is the recipe which was adapted from Bakerella.com


Ingredients:

1/2 cup (1 stick) unsalted butter, room temperature
1/4 cup granulated sugar
1/2 cup packed dark brown sugar
2 tablespoons milk
1/2 teaspoon vanilla
1 1/4 cups all purpose flour
1/2 teaspoon salt
1/2 cup good quality chocolate chips ( I used Ghirardelli)


Directions:
  • In a large bowl, beat butter and sugars with an electric mixer until light and fluffy (about 3 minutes)
  • Mix in milk and vanilla
  • Add flour and salt and mix on low until combined
  • With a wooden spoon or spatula stir in chocolate chips
  • Chill dough in refrigerator for about 30 minutes until firm enough to roll or scoop into bite size pieces.  Freeze until ready to serve.
Enjoy! I know I will.


Wednesday, July 18, 2012

Review: Kemp's SnoBlitz soft serve

During a recent trip to my local grocery store they were sampling a new Kemp's ice cream treat called the SnoBlitz- a soft serve ice cream treat.  I had to give it a try.  I have two weaknesses in life: soft serve ice cream and sheet cake.  

The SnoBlitz comes in a malt cup and is contains 2.5 servings each about 140 calories.  There were a few varieties available: brownie batter, cookie dough and cookies and cream.  Overall, I thought the ice cream was tasty and the brownie batter bites were also pretty good.  


As for the texture, it was interesting.  I anticipated the texture to have the smooth, icy, texture of a soft serve from a machine.  The texture of the Sno Blitz is more of a whipped quality.  It is pretty light but it was missing the smooth, creaminess that you normally get with soft serve.  

Overall, I think it was worth a try but I will not be running back for more.  This just wasn't soft serve ice cream for me.  It was whipped ice cream.  The next time I need a soft serve fix I think I'll try DQ.


Monday, July 16, 2012

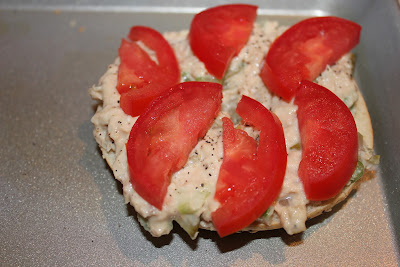
Tuna "melt" with cabbage


We recently joined a CSA and have been drowning in a sea of cabbage for the last three weeks.  Seriously,  I have started eating cabbage at almost every meal.  I have put it in smoothies, salads, sandwiches, and stir fry.  One of the most satisfying new cabbage recipes is a crunchy tuna salad.  Adding cabbage gives the tuna salad a great texture and adds a lot of good nutrition.

Here is the recipe I loosely follow

Ingredients:


One 5-ounce can tuna, drained
2 cups finely chopped cabbage
1 stalk of celery, chopped

1/4 cup minced chives or onions
1 pickle chopped into very fine pieces
1 tablespoon mayonnaise
3 tablespoons yogurt
1 tablespoon honey mustard or regular mustard
Salt and freshly ground black pepper
Directions:
Shred the tuna with a fork and stir in the rest of the ingredients. Taste and add salt and pepper to taste.  Adjust this recipe as you wish.  I will even add some cajun seasoning to this for a little extra "kick."
To make a tuna "melt" I assemble this on a everything baglethin, top with a tomato (also from our CSA) and you can add cheese if you like. ( I do not like cheese and fish together but love this sandwich warmed under the broiler)  Put under broiler until the edges of the bagel turn brown.  
The remaining tuna salad can be refrigerated for up to two days.


Friday, July 13, 2012

Roasted Almonds


I am always a sucker for a good deal.  This recently led to my purchase of a 3 POUND bag of almonds from Costco.  The price was too good to pass up and almonds are a great source of protein.  Below is a recipe for toasted almonds.  This is a very loose recipe that you should feel free to improvise.  Also, I use my nose more than anything to decide if the almonds are roasted enough.  When your kitchen is filled with a very fragrant scent, the nuts are done.

Ingredients:
Almonds
Honey or Maple Syrup
Salt
Seasoning of your choice: cinnamon, cocoa, sugar, brown sugar, chili powder

Directions:
Heat oven at 350
On a cookie sheet, spread almonds out so that they are not overlapping
Drizzle honey or maple syrup over the almonds.  You need less of this than you think because it will melt in the oven.
Stir almonds until evenly coated
Sprinkle with salt
Sprinkle with seasoning
Stir again if needed
Bake for about 10 minutes, stirring occasionally
When almonds are done baking, use a spatula to spread them out onto a greased piece of parchment paper and allow to cool.  At this point I will taste one and adjust the seasoning if needed.
Enjoy!


Monday, June 18, 2012

Ice Cream Cone Cupcakes

Somebody in my house turned 26 recently and a party was in order.  We invited our friends over for drinks and snacks before heading out to the bars in Uptown.  I knew that cupcakes or cake were a must.  However, I also wanted something that wasn't too messy or too fussy so people could easy grab and eat while chatting.  I settled on these ice cream cone cupcakes which are my friend Kelly's specialty.  They were quite the hit!  I was surprised by the number of people at the party who had never had these before.  


Here is the recipe I used.  It can also be found on the side of many cake cone boxes.


Ingredients:
1 box of funfetti cake mix (or your mix of choice)
1 box of cake cones
Frosting of your choice (either the store bought or recipe below)


Directions:
- Follow the recipe on the cake mix box
- Place 12 cake cones in a muffin tin
- Fill each cone 3/4 full with cake mix
- Bake at 350 for 18-25 minutes or until a toothpick comes out clean
- Immediately take baked cupcakes out of the muffin tin and place them on a cooling rack. This prevents   the cones from getting soggy
- Repeat the filling/baking process until all your cake mix has been used


Frosting
- Once cupcakes are completely cool it is time to frost them
- If you bought store bought just spread it on ;)

Or

Cream Cheese Frosting

Ingredients:
1/2 cup of butter (1 stick), room temperature
1 package of Philly cream cheese (low fat is fine), room temperature
2 - 3 cups of powdered sugar
1 teaspoon of vanilla extract
-With an electric mixer, mix the butter and cream cheese together, about 3 minutes on medium speed until very smooth. Scrape down the sides and bottom of the bowl to ensure even mixing.
Add the vanilla extract and mix. Slowly add the powdered sugar. Keep adding until you get to desired sweetness and thickness.
Either spread on with a blunt knife or spatula, or spoon into a piping bag to decorate your cupcake


Place cones in muffin tin cups and fill 3/4 full


Bake at 350 for 18-25 minutes until a toothpick comes out clean

Once cupcakes are completely cool, frost, decorate, and place animal print candle in the center.    Now, sing happy birthday and celebrate!

Friday, June 15, 2012

Food for our Fathers

Sunday is Father's Day.  I have a nice little day planned with my Dad.  We are going to start with a hike through a Minnesota state park, have a picnic lunch, then drinks out on the deck, grill out for dinner and have Blueberry Pie (his favorite) for dessert.  It should be a great day!

 Here are some recipes I have been combing through in preparation for the festivities:


I'll let you know what I end up choosing.  Happy Father's Day everyone!

Wednesday, June 13, 2012

Summer Smoothie

I start each day with a smoothie for breakfast.  I used to make a Green Monster Smoothie (recipe found here.)  However, after a few months of that I got a little tired so I decided to make my own.  This new recipe combines frozen berries, rhubarb (which we still have in abundance), spinach/kale, protein powder, and some orange juice.   I think this makes for a very balanced and healthy start to my day.


My smoothies always look something like this...

Here is the recipe I use but feel free to experiment with what you have on hand.  It is a smoothie after all.

1/2 frozen berries
1/4 cup rhubarb (frozen)
1/2 banana (frozen)
handful of spinach/kale
1/3 cup orange cup
1/3 cup or more of water to make it blend smoothly
1/2 scoop protein powder (I use vanilla)
you can also add in some flaxseed (my mom adds this to smoothies for the heart healthy benefits)

Blend until smooth and enjoy!

Monday, June 11, 2012

Some Many Recipes, So Little Time

I may have a food blog addiction.  I am currently following over 20 different food bloggers on a daily basis.  Logging into my Google Reader and getting the daily rundown is now part of my routine.  I follow bloggers that write about everything from clean eating (Gracious Pantry) to baking (Brown Eyed Bakers) to vegan (Engine 2 Diet) to breads (Wild Yeast) and a little bit of everything in between.   When I see a recipe I want to try I will copy the URL into an email and then email it to myself.   Recently, I discovered that I had a large number of recipe emails.  So, here is a list of Summer recipes you should give a try:

Smitten Kitchen: Tzatziki Potato Salad: a new twist on a summer classic.

Mississippi Kitchen: Layers of Love Torte: a calorie BOMB but I sent this to my brother because it looked like something he would devour and still stay incredibly skinny (I hate him for this).

Annie's Eats: Mexican Lasagna: a little odd to mix mexican and italian but I sent this to my friend CT.  It totally looked like something she would enjoy.

Brown Eyed Baker: Salted Caramel Chocolate Chip Cookie Bars: I will make these.  Yum!

Let me know if you give any of these a try.  I'd love to hear how the recipe turns out for you.

Friday, June 8, 2012

Cookbook Shopping Spree

I recently went on a bit of an Amazon.com shopping spree for some new cookbooks.  I only bought three new books but they are three thick, intense books full of some really great recipes and even better insight.

Here is what I bought:


The Bread Baker's Apprentice by Peter Reinhart
This is a textbook on how to make unbelievable bread.  I first came to know Peter Reinhart's recipes when I made his Blueberry Bagels from scratch.  The bagels were so good I nearly shed a tear.  Reinhart's book is filled with beautiful images, easy to understand instructions and great insight into the science and chemistry of baking.

How to Cook Everything- The Basics by Mark Bittman
Mark Bittman is one of my all time favorite food writers.  I follow his column in the New York Times and have made countless recipes he has recommended.  What I really like about Bittman is that he always has a good story behind the food he is cooking.  Also, Bittman's push for a more responsible food philosophy is something I respect.  This cookbook on the basics is just that: basic.  However, it covers a wide variety of food, techniques and preparations and is something no kitchen should be without.

The Complete America's Test Kitchen Cookbook
America's Test Kitchen is one of my favorite shows on television. (Thank you PBS!).  Their scientific approach to recipes and food is fascinating to me.  Additionally, since every recipe is tried, tried, and tried again in the test kitchen before printed in this book you are almost guaranteed a foolproof recipe.  The book also includes the Test Kitchen taste tests and product recommendations to ensure you buy the best of everything from chocolate chips to stockpots.

I strongly recommend all three of these books.  If you have any additional recommendations for me, please send them my way!

Thursday, June 7, 2012

Red Velvet Cake

March 29th is a special day in our family (yes, this post is really delayed!).  It is my Dad AND my brother's birthday.  This year my Dad requested a red velvet cake to celebrate.  After searching the web for a good recipe, I settled on a Southern style recipe with some modifications.  I also learned that red velvet cake is basically chocolate cake with a TON of red food coloring thrown in!

Ingredients
vegetable oil, for the pans
2 1/2 cups all-purpose flour
1 1/2 cups sugar
1 teaspoon baking soda
1 teaspoon salt
1 teaspoon cocoa powder
1 1/2 cups vegetable oil
1 cup buttermilk, at room temperature
2 large eggs, at room temperature
2 tablespoons red food coloring ( 1oz)
1 teaspoon white distilled vinegar
1 teaspoon vanilla extract
Cream cheese frosting
1 lb cream cheese, softened
4 cups sifted confectioners' sugar
1 cup unsalted butter, softened ( 1 cup)
1 teaspoon vanilla extract


Directions
1.     Preheat the oven to 350 degrees F. Lightly oil and flour 3 (9 by 1 1/2-inch round) cake pans.


2.   In a large bowl, sift together the flour, sugar, baking soda, salt, and cocoa powder. In another large bowl, whisk together the oil, buttermilk, eggs, food coloring, vinegar, and vanilla.

3.   Using a standing mixer, mix the dry ingredients into the wet ingredients until just combined and a smooth batter is formed.


4.  Divide the cake batter evenly among the prepared cake pans. Place the pans in the oven evenly spaced apart. Bake, rotating the pans halfway through the cooking, until the cake pulls away from the side of the pans, and a toothpick inserted in the center of the cakes comes out clean, about 30 minutes.
5.  Remove the cakes from the oven and run a knife around the edges to loosen them from the sides of the pans. One at a time, invert the cakes onto a plate and then re-invert them onto a cooling rack, rounded-sides up. Let cool completely.


6. Cream Cheese Frosting: In a standing mixer fitted with the paddle attachment, or with a hand-held electric mixer in a large bowl, mix the cream cheese, sugar, and butter on low speed until incorporated. Increase the speed to high, and mix until light and fluffy, about 5 minutes. (Occasionally turn the mixer off, and scrape the down the sides of the bowl with a rubber 

7. Frost the cake. Place 1 layer, rounded-side down, in the middle of a rotating cake stand. Using a palette knife or offset spatula spread some of the cream cheese frosting over the top of the cake. (Spread enough frosting to make a 1/4 to 1/2-inch layer.) Carefully set another layer on top, rounded-side down, and repeat. Cover the entire cake with the remaining frosting. 


8. Enjoy with the Birthday Boys!


Wednesday, May 16, 2012

Pimms Cup

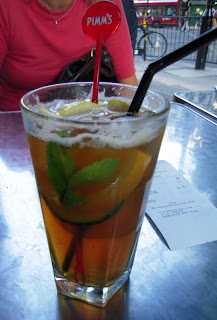
In 2009, I spent a week in London visiting my older brother.  My brother was working as a banker there for an entire year and living in South Kensington.  This means that I was able to stay in one of the best neighborhoods in London for FREE.  During my visit, I saw the sights, ate the food, experienced the culture and most importantly I drank the drinks.  My favorite was a refreshing cocktail called, The Pimms Cup.

The Pimms Cup is everywhere during the Summer in London.  Pimms is a British citrus liqueur.  A Pimms Cup is this liqueur with some "lemonade" (we call it Sprite) and garnish.  It  is served in pitchers or in a pint glass.  The garnish usually includes mint, cucumber, lemon and sometime strawberries.  

Since getting back to the States I have found Pimms to be somewhat difficult to find but definitely worth the search.  Below is a recipe for what should be your new favorite Summer cocktail.  Cheers!


Pimms Cup

Mix 1 part PIMM'S* No.1
with 3 parts chilled "lemonade" (Sprite or Gingerale)add some mint, cucumber, orange and strawberry


Thursday, May 10, 2012

Irish Soda Bread Muffins


This post could also be titled, "what to do with leftover buttermilk."  Buttermilk is such a rare ingredient that I was somewhat at a loss for how to use it up.  Then I recalled that when I was growing up the presence of buttermilk in the fridge usually meant my Mom was baking Irish Soda Bread.  I chose to give this recipe a try because it maintains the same great flavor without having to make an entire loaf of bread.  In fact, I baked this recipe, allowed it to cool and then put the most of the muffins in the freezer.  They will be a great treat to warm up one by one.


Ingredients:
2 cups all purpose flour

3 Tablespoons granulated white sugar
1 1/2 teaspoons baking powder
1/2 teaspoon baking soda
1/2 teaspoon salt
1/4 cup salted butter
1 cup buttermilk (low fat is fine)
1 large egg, beaten
3/4 cup raisins (I used golden raisins because that's what my mom always uses)

Directions:
1. Preheat oven to 375°F. Spray small muffin tins or large muffin tins with nonstick spray.
2. In a large bowl, whisk together flour, sugar, baking powder, baking soda, and salt. With pastry cutter or two knives used scissors fashion, cut in butter until mixture resembles coarse crumbs. (You can also do this part in a food processor and let the blades mix the flour & butter together or just use your fingers). In a small bowl, stir together buttermilk and egg until blended. Add buttermilk mixture to dry ingredients and stir to combine but do not over stir. Stir in raisins.
3. Spoon batter into prepared muffin cups.  Then, take a brush and lightly brush the top of each muffin with a little egg. Bake 20 to 25 minutes (longer for the larger muffins), or until cake tester inserted in center of one muffin comes out clean.
4. Remove muffin tin or tins to wire rack. Cool 5 minutes before removing muffins from cups; finish cooling on rack. Serve warm or cool completely and store muffins in an airtight container at room temperature.


Tuesday, May 8, 2012

Flappers


Last weekend, JQ, Lukey and I had breakfast at Colossal Cafe in St. Anthony Park (website found here).  It is the cutest place owned by one of our former high school classmates.  My review of her place, "oh. my. gawd!"

If you are in the tri-state area you need to make your way to Colossal!  Everything was amazing.  The space is cute, the people are friendly, the coffee is strong (and there are self-serve refills!), all the food is homemade delicious and the menu is filled with great cafe/diner comfort foods.  There was one item in particular that I have seriously been thinking about ever since we left.  That item is the Flapper.

A Flapper is a yeasted pancake.  It is lighter than a normal pancake and has much more flavor.  I also thought the texture was far superior.  Instead of being soggy like a normal pancake, this held its form and had something like a crust on it.  I consider myself somewhat of a pancake connoisseur and will rate these Flappers as the best darn pancake EVER.

Here is a recipe I came across for yeasted pancakes.  I am going to attempt to make these at home but will definitely also return to Colossal very soon.


Recipe adapted from Martha Stewart

  • 1 1/2 cups milk
  • 2 tablespoons sugar
  • 1 package active dry yeast
  • 1 1/2 cups all-purpose flour
  • 1/2 teaspoon salt
  • 4 tablespoons unsalted butter, melted
  • 3 large egg yolks
Directions

Heat milk in a small saucepan over medium heat until lukewarm ( or microwave for about 20-30 seconds). Transfer milk to a large bowl, and stir in sugar and yeast. Let stand until creamy, about 5 minutes.


Whisk in flour, salt, butter, and egg yolks until batter is smooth (don't overstir). Cover bowl tightly with plastic wrap. Transfer bowl to a warm place (I always use my unheated oven); let dough rise until doubled (about 1 1/2 hours)


Heat griddle to 375 degrees. Using a 2-ounce (1/4-cup) ladle, pour batter onto griddle, creating several pools, 2 inches apart. Cook pancakes until bubbles form on the top and the edges are slightly dry, about 3 minutes. Using a spatula, flip pancakes; cook until golden on bottom, about 1 1/2 minutes.  Repeat with the remaining batter. Serve warm.